How To Configure CAA Records
When using Universal SSL, do not configure CAA records
When you enable Universal SSL and add CAA records via the Cloudflare DNS app, Cloudflare automatically adds three additional CAA DNS records for each of our Universal SSL CA providers (currently comodoca.com, digicert.com, and globalsign.com). Cloudflare does not append additional CAA records if Universal SSL is disabled or if no CAA records are added via the DNS app.
These CAA DNS records do not display in the Cloudflare dashboard DNS app. However, if you run a command line query using dig, any existing CAA records will show, including the ones added by Cloudflare Universal SSL.
If you don’t want or need Cloudflare Universal SSL, you can disable it in your Cloudflare Crypto settings. Disabling SSL automatically deletes the CAA DNS records for our official providers, mentioned above.
Disabling Universal SSL leaves your Cloudflare-enabled DNS records without SSL support, unless you upload a custom SSL certificate (available for Cloudflare Business and Enterprise customers).
When using your own certificate, configure your CAA records
If you’re using your own origin server SSL certificate (that is, a certificate that was not provisioned by Cloudflare), you need to manually add a CAA DNS record for each Certificate Authority (CA) that you plan to use for your domain.
Configuring only applies to certificates issued by a CA. You cannot add CAA records if you’re using a self-signed certificate in your origin web server.
To add a CAA record:
1. Log in to the Cloudflare dashboard.
2. Ensure the website you want to update is selected.
3. Click the DNS app.
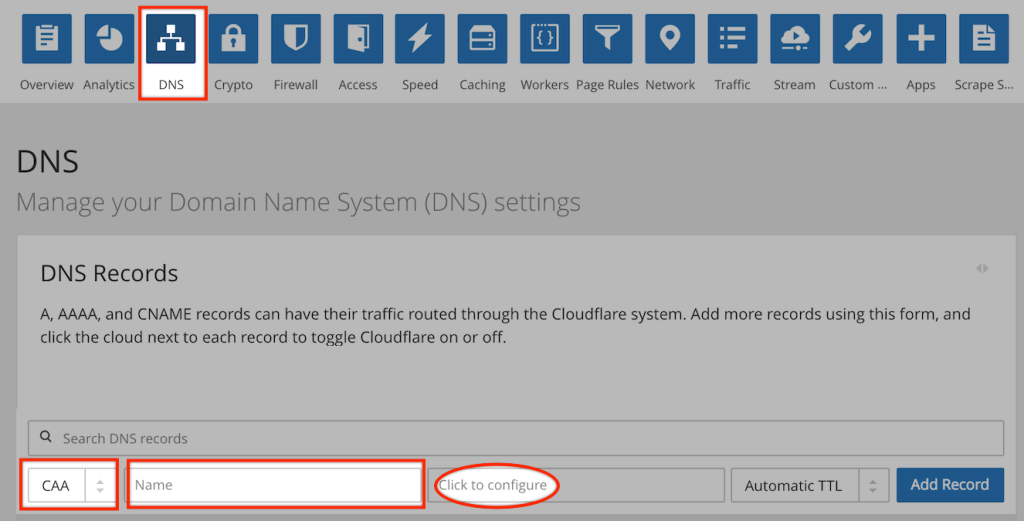
4. In the DNS Records panel, click the record type dropdown to select CAA.
5. In the Name text box, type your domain.
6. Then in the Click to configure text box, click to enter configuration details.

7. In the Add Record: CAA content dialog, select a Tag: either Only allow specific hostnames or Only allow wildcards, as appropriate. The default tag is Only allow specific hostnames.
8. For Value, enter the CA name.
9. Click OK to close the dialog.

10. Back in the DNS Records panel, verify that the information you entered is correct and then, click Add Record to save your changes.
You can repeat the steps above for each CA to associate with your domain. Once you have finished creating all the records, you can review them in the list of records appearing under the DNS Records panel.
A CA queries the authoritative DNS . Therefore, CAA records added to the Cloudflare DNS app for a domain on a CNAME setup are not used.

